
Welcome to the start of your next obsession.
Seriously, I have both seen it myself and also coached multiple people through this phase of their smart home journey.
This is a big rabbit hole. It is a fun one. Yes, sometimes frustrating. Is it worth it? Well…
Don’t panic.
My honest answer is that it is definitely fun… for you. If you are reading these words then you are ready to take the red pill and dive deep.
Don’t worry about all of the time, blood, sweat, tears, lights that won’t turn on, and weird automations kicking off in the middle of the night.

So…. with that being said, the first thing you should do is to simply… breathe.
Really, this is a marathon, not a sprint. I will be laying out building a fun whole-home dashboard but I have been learning, building, changing, re-building, and learning for 10+ years now.
The fact is – my dashboard isn’t finished. It probably never will be.
There will always be new types of sensors. Heck – I still don’t even have all of my light switches changed out to smart switches. So there is always more work to do.
Which brings me to the second step here.
Just. Get. Started.
The first thing you need to do is to install Home Assistant. I am not going to even attempt to try and walk you through this. There are too many variables here, what hardware you have, docker vs VMs, and many other considerations here.
What I will say is that my instance is running in a VM on an Unraid server and utilizes the HAOS image.
I will also say that there is excellent documentation on the HA site and you should definitely read and bookmark the site. Here is a good starting point for installations: https://www.home-assistant.io/installation/
This is also a good point to state that a great tool for working with your setup is to leverage AI. I use it myself for figuring out things. One word of warning – this is your setup, not an AIs. The answers that you get from it can be very confident and solid, but they can also be wrong. Just remember, you are responsible for your own setup. Warning delivered.

Now for step 3. At this point hopefully you have HA installed and have started adding devices and integrations. What I would recommend right now is to sit back, relax, and take a few weeks here.
The reason for this is twofold. First, once you configure sensors and integrations in your setup, they need a little bit of time to settle in. HA stores data and history on your sensors and it is a little bit easier to understand how your system is working if you can check out this historical data.
Next – it never hurts to play around a little bit. Create a play dashboard. Add sensors. This is a great time to get to know your setup a little better. Chances are, you won’t nail your dream dashboard on your first try. The more you know, they better off your next build will be.
Impatient? Skipping the play period and jumping right in? Or maybe you have had HA up and running for a while and are now ready to dive in and build your dream dashboard. I get it.
Let’s get started with that effort.
First, we will need a floorplan. There are many ways to get a floorplan. This project will start with a basic, top down blueprint. For my personal HA dashboard, I started with the plans that I drew up when we built the house.
If you don’t have plans like this there are may ways to create them.
A few of the popular options that the community likes a lot include Floorplanner ( https://floorplanner.com/ ) and SweetHome3D ( https://www.sweethome3d.com/ ).
I have played around with both of these and they are solid options. They take some effort and there is a small learning curve for a new tool.
There are even plugins for 3D generation of your floorplan like this one ( https://github.com/shmuelzon/home-assistant-floor-plan/ ) with SweetHome3D. The main issue here is that you need a floorplan first for that plugin to work.
You can also use AI to generate a floorplan. For this project I am going create a new made up floorplan with AI. After some trial and error, I settled on this prompt:
Architectural blueprint floorplan, single story home, white background with black lines only, no color fills, no furniture, technical drawing style. Top-down orthographic view. Exterior walls are thick, interior walls are thin. All rooms are labeled with clean sans-serif text centered in each space. No hallways — rooms connect directly to each other.
The main living area is a rectangle divided into a 4-column by 3-row grid. All rooms fit within this rectangle.
Top row, left to right: main bedroom (largest bedroom, occupies top-left); main bathroom attached to main bedroom containing a toilet area, walk-in shower, and two sinks; walk-in closet attached to main bedroom; sitting room; second bedroom with an attached closet and attached bathroom containing a toilet, sink, and tub/shower combo.
Middle row, left to right: laundry room and powder room combined as a mudroom (connects to garage on the left exterior wall and to the main house interior); large open living room spanning the two center columns of the middle row; dining room on the right.
Bottom row, left to right: mechanical room in the bottom-left corner; entryway with a front door on the bottom exterior wall centered on the rectangle; kitchen with attached walk-in pantry; breakfast nook in the bottom-right corner.
A double car garage is attached to the left exterior wall of the main rectangle, extending outside the main rectangle only. The garage has a garage door on its left exterior wall and an interior door connecting directly to the laundry/mudroom. The garage spans the top and middle rows on the left side.
Doors are drawn as a thin line with a quarter-circle arc showing swing direction. Exterior walls have window openings on multiple sides. No stairs. No color. No shadows. No furniture. Top-down orthographic view.
For the image generation I ended up using Gemini. At the time of this writing, this is my preferred AI image generator. That prompt generate this image:
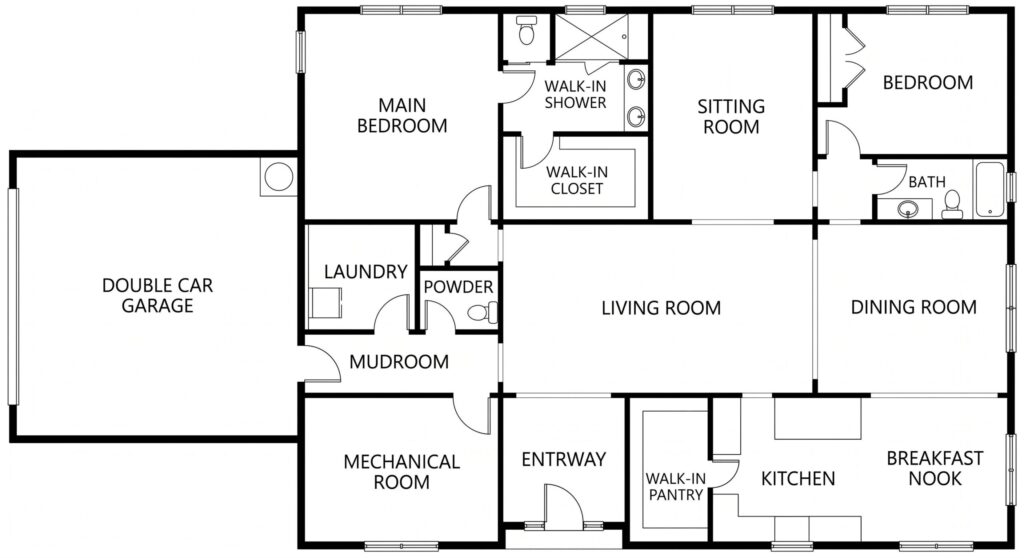
Nice! We have our dashboard floorplan.
I will add one caveat to consider here. This does NOT need to be 100% accurate. The reason for this is that you are making a home dashboard, not a detailed architectural drawing. You own this output, it doesn’t own you. So if you want to rename a room or merge some walls together or knock down a wall on your dashboard? Go for it.
The point here is that a good dashboard needs to match your home, devices, and needs. It doesn’t need to match down to the millimeter the dimensions of your actual space. Tweaking a hallway to get a few HA icons into the dashboard or combining a room with another one because it makes sense for your HA sensors are all good ideas here.
Remember the goal – building your dream dashboard. And now that we have a floorplan it is time to dive into design in the next post in the Wizards Warren series.
As always, thanks for reading and have an awesome day!